Not fashion related at all, but the home renovating bug bit me last week. I’ve bought tons of furniture at yard sales and thrift stores over the past few months in hopes to re-upholster, repaint, re-stain and polyurethane. Its something about recycled reworked furniture that I absolutely love. It’s an overwhelming rush to find that perfect piece and rework it into whatever I want it to be. I love how imperfect it is, a simplistic work of art by me! So I finally decided to start small and work my way into he bigger projects. I got this ottoman for $5.00 at a yard sale a year ago,threw it in storage and finally decided to get started. Inspired by the cozy elements already in my living room and just wanted to add in the ottoman. This update was simple to hard and supplies were $26.00.
INSPIRATION: Cozy lived in living room and gold button details


ITEMS NEEDED: Staple gun, scissors, fabric to cover, screw driver or power drill (to remove screws in legs) & buttons (optional)


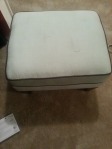
BEFORE:

HOW TO:
1. Cut the fabric into the shape of the ottoman,turn it over and make sure the fabric is big enough to cover and fit.
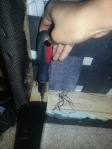
2. Set the fabric aside and remove the legs using your screw driver or power drill. This step ensures the fabric is fitted tightly on all corners and is a neater look.
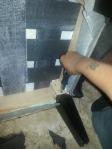
3. Fit the fabric on the ottoman on one side, pull it tight and staple it to the base. Continue on all 4 sides. This is also the step before you staple down the 3rd side of the ottoman you hand sew on the buttons in the center for decoration.

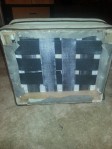
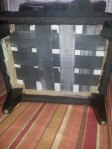
4. Screw the legs back on (this is the step I wished I had a power drill). The 2nd pic is all 4 legs on and notice the fabric stapled on all sides to the base of the ottoman.
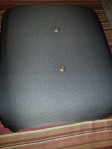
FINISHED: This simple update took me about an hour and a half. Only because I tried to take short cuts only to realize the correct way was faster after all! This is a partial pic of the living room where the ottoman is, A top view of the button details, and the corners, I rolled and stapled them to give it a pleated look.


I’m so excited and happy for my simple at home D.I.Y. Do you have home D.I.Y projects that you want to share? Email me your how to and pics to kisha@naturalgalsdiary.com.
